


UPDATED 8/10/16: I am so thrilled that people still find this tutorial useful! I’ve grown a lot as a DIYer since I first wrote this tutorial (and even launched a skincare business), and to give you the best experience possible, I’ve updated the instructions based on my own personal best practices. The recipe itself is the same.
Back to our originally scheduled programming…
I have tried a lot of DIY vitamin C recipes in my time. A lot. Of. Recipes. I’ve experimented with different emulsifiers, solubilizers, humectants, film formers, even preservatives. I used every online recipe I could find and tried to tweak them all. I hated almost everything I made.
In a fit of desperation, I Googled around to see if anyone had created a dupe of the phenomenal Skinceuticals CE Ferulic serum. Lo and behold, Lotioncrafter had just the thing. I tried it, and it worked. It worked beautifully. The hero here, in my eyes, is the ethoxydiglycol, which makes it feel light and clean on your skin while also helping everything dissolve and stay stable.
Thoughts About This Recipe
If I had seen this recipe as a new DIYer, I would have balked. With the amount of ingredients and tools I’d have to buy, surely it would just be cheaper to buy a finished vitamin C serum.
First, to paraphrase Chel at Holy Snails, DIY isn’t cheap, it’s cost effective. There’s a big initial investment, but once you have all the stuff, you can make nearly endless refills for pennies.
Second, this ain’t no bottom-shelf, Amazon-reseller serum. This is a very, very convincing dupe of Skinceuticals CE Ferulic serum, which is $120 an ounce. That serum is also patented, so you can’t just buy a knockoff elsewhere. (You also can’t sell the stuff you’re making, but I hope you wouldn’t be taking recipes from this or any blog and trying to sell them for a profit.)
I am in capital-L Love with this product. It feels light and silky going on, it absorbs quickly, it doesn’t dry out my already-dry skin out (which is very rare for an active like this), and it does incredible work brightening, evening, and exfoliating.
I’ve made this recipe a few times and tweaked it along the way. I certainly don’t claim this as an original recipe – it’s 95% the same as the Lotioncrafter one – but there are some optimizations I’ve made, so I figured I’d share. Plus, my how-to has pictures!
Step 1: Gather Your Ingredients


Here are all the ingredients you’ll need. I highly recommend Lotioncrafter, Personal Formulator, and The Herbarie – I trust their quality completely and have only had positive experiences with them. MakingCosmetics is also a great resource, as are From Nature With Love and Ingredients To Die For.
- L-Ascorbic Acid
- Tocopherol (on Lotioncrafter, this is called Mixed Tocopherols 95%)
- Ferulic Acid
- Ethoxydiglycol
- Propylene Glycol
- Laureth 23 (for whatever reason, this is the only emulsifier I’ve found that works in vitamin C recipes)
- Panthenol
- 1% Hyaluronic Acid stock (you can either buy this premade on Personal Formulator, or make your own by mixing 1% normal molecular weight hyaluronic acid, 98.7% distilled water, and 0.3% Liquid Germall Plus in a bottle and letting it hydrate overnight)
- Distilled Water
- Liquid Germall Plus
You can add 1-2% of your favorite oil, for extra moisture and/or antioxidant effect – I sometimes add squalane. I’ve also been playing with the idea of adding some CoQ10, but it’s just so expensive. Note: if you do add an extra ingredient, it’ll be quite a lot thicker and stickier.
Step 2: Gather Your Tools


This looks like a lot, and it is. Since this is an emulsification, we have to heat and hold our separate oil and water phases at 70°C for 20 minutes and then mix it thoroughly, which means we need a whole bunch of extra tools we might not need for oil-only creations. You might have some of this stuff already lying around.
Check out my beginner’s shopping list and recipe for links to the basic DIY tools!
From left to right, I’m using:
- A scale that measures to 0.01 grams
- 70% isopropyl alcohol wipes for disinfecting
- A 1 oz colored glass dropper bottle to put the final product in (vitamin C is extremely sensitive to light, so a dark color for the glass is best)
- Powder-free latex gloves
- 2 borosilicate glass beakers, one for oil and one for water (make sure at least one of these beakers is big enough to fit a single beater from your electric mixer, if you’re using one)
- pH strips (the kind with four color boxes are much more accurate than the single-color kind)
- A hot plate
- A large borosilicate tub, to do my heating and holding
- A silicone trivet, to keep the beakers up off direct contact with the hot plate (I pictured a clay triangle here, which ended up getting rusty – a cheap silicone trivet works way better)
- Some disposable plastic pipettes (I DIY a lot so I bought this box of 500 of them and I love it much more than a person should love a box of 500 disposable plastic pipettes)
- A glass stirring rod
- Some aluminum foil
- A little spatula for measuring out dry ingredients (learn from my mistake and get a plastic one, not a metal one – you don’t want to use metal on L-ascorbic acid. You can use disposable spatulas if you want)
- A digital meat thermometer
- Disposable plastic boats for measuring out dry ingredients
- A kitchen hand mixer and a single beater for it
Step 3: Disinfecting Everything
If DIYers had a reality show on TLC, it would be called “Let’s Disinfect!” It takes so long but it’s so necessary.
- Wash your hands and put on gloves
- If you have liquid 70% isopropyl alcohol, pour it into your two beakers and let it sit while you do the rest of this
- Wipe down all surfaces with alcohol wipes (I like to follow this up by placing down clean paper napkins)
- Wipe down your stirring rods, spatulas, beater, and scale
- Disinfect your dropper bottle. Wash it with soapy water, rinse it well, then swish some isopropyl alcohol around and let it dry
- Swish around the alcohol in your beakers, pour it out, and rinse several times with distilled water (after that, you can either wait for it to air dry or wipe dry with a clean paper napkin)


Step 4: The Recipe
Here’s the full recipe to make 1 ounce of serum.
| Ingredient | Percent | Weight (g) |
| L-Ascorbic Acid | 15.00% | 4.5 |
| Propylene Glycol | 10.00% | 3.0 |
| Laureth 23 | 3.00% | 0.9 |
| Tocopherol | 1.00% | 0.3 |
| Liquid Germall Plus | 0.30% | 0.09 |
| Ferulic Acid | 0.50% | 0.15 |
| Ethoxydiglycol | 20.00% | 6.0 |
| Panthenol | 0.50% | 0.15 |
| Distilled water | 34.70% | 10.41 |
| 1% HA stock | 15.00% | 4.5 |
| Total | 100.00% | 30.0 |
Personally, I measure out dry ingredients into plastic boats, and I pipette wet ingredients directly into the beaker one drop at a time. The latter strategy is risky, but if you go slowly and have patience, it’s a lot easier than trying to scrape sticky tocopherol from the bottom of a plastic boat.
Step 5: Water Phase
I like to start with the water phase, but steps 5 and 6 are interchangeable.
- Combine propylene glycol and ferulic acid in beaker A and stir until dissolved. Ferulic acid is stubborn, so it will start out like this:
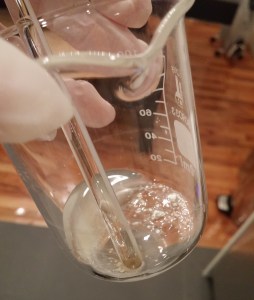

- But after some mixing (you can speed this up by sticking it in a warm water bath), it’ll dissolve completely:


- Once it’s dissolved, add the hyaluronic acid stock, distilled water, and panthenol; stir until it’s an even consistency


Step 6: Oil Phase
This one’s easy.
- Combine tocopherol, laureth 23, and ethoxydiglycol in beaker B. No real point stirring, since laureth 23 is just big waxy chunks.


Step 7: Heat and Hold
The laureth 23 is still solid, so let’s get it all liquid-ed up.
- Fill the borosilicate tub partway with tap water and put your silicone trivet in it
- Put it on your hot plate and heat it until it reaches 70°C. (My hot plate sucks, so I turn it on until it reaches 58°C, then unplug it. At that point, the residual heat will take it to 75°C, and over the course of 20 minutes, it’ll cool to 65°C. Good enough for me.)
- Cover your oil and water phase beakers with aluminum foil to prevent evaporation and keep them clean.
- Place your two beakers on the silicone trivet – you can remove water with a pipette if the water level is too high and the beakers are floating
- Hold them at that temperature until the oil phase beaker melts
- Watch how they turn clear! Science is so cool!


Step 8: Emulsification
Once everything is good and melted, your phases are ready to combine.
- Dry off the outside of beaker A (the water phase), weigh it, and note the difference – in a few minutes, you’ll add this back in distilled water to get it to its pre-heating weight
- Pour the contents of the smaller beaker into the larger one (or however your beakers are sized – the important thing is that everything is in a beaker big enough to fit a hand mixer beater)
- Immediately start mixing with a single beater on your hand mixer’s lowest setting. Mix for 1-2 minutes. As you mix, keep an eye on the texture. It may start gelling up like snot. If it does, stop. If it doesn’t, keep going to the 2 minute mark.
- Add distilled water equal to the difference between pre- and post-heating weight
- Leave it until it feels about room temperature to the touch
Step 9: Final phase
Now is the time to add your heat-sensitive ingredients – in this recipe, that’s L-ascorbic acid and preservative.
- Add the L-ascorbic acid and stir gently with a glass stirring rod. Be careful – too much agitation will make that gelling problem worse. Stir until it’s completely dissolved.


- Add the Liquid Germall Plus and stir again with a glass stirring rod. If it’s gelling up, again, just stir in short bursts until it’s mixed throughout. The recipe should be completely clear, with a slight champagne/pale yellow color.


Step 10: pH Test, Bottle and Celebrate
Almost done!!
- Smear a little bit over a pH strip – I aim for around 3, since you want this to be between 2.5 and 3.5. If it’s way off, you can add citric acid to lower the pH or sodium lactate or triethanolamine to raise it.
- Pour the final product into your colored glass dropper bottle, or, if it’s too gelled to pour, transfer it with a pipette
- Label the bottle with the name of the product and today’s date
- Pour yourself a stiff drink – you’ve earned it


If you do end up trying this recipe, let me know what you think! I’m always looking for ways to improve.