UPDATED 8/10/16: I am so thrilled that people still find this tutorial useful! I’ve grown a lot as a DIYer since I first wrote this tutorial (and even launched a skincare business), and to give you the best experience possible, I’ve updated the instructions based on my own personal best practices. The recipe itself is the same.
Back to our originally scheduled programming…
I have tried a lot of DIY vitamin C recipes in my time. A lot. Of. Recipes. I’ve experimented with different emulsifiers, solubilizers, humectants, film formers, even preservatives. I used every online recipe I could find and tried to tweak them all. I hated almost everything I made.
In a fit of desperation, I Googled around to see if anyone had created a dupe of the phenomenal Skinceuticals CE Ferulic serum. Lo and behold, Lotioncrafter had just the thing. I tried it, and it worked. It worked beautifully. The hero here, in my eyes, is the ethoxydiglycol, which makes it feel light and clean on your skin while also helping everything dissolve and stay stable.
Thoughts About This Recipe
If I had seen this recipe as a new DIYer, I would have balked. With the amount of ingredients and tools I’d have to buy, surely it would just be cheaper to buy a finished vitamin C serum.
First, to paraphrase Chel at Holy Snails, DIY isn’t cheap, it’s cost effective. There’s a big initial investment, but once you have all the stuff, you can make nearly endless refills for pennies.
Second, this ain’t no bottom-shelf, Amazon-reseller serum. This is a very, very convincing dupe of Skinceuticals CE Ferulic serum, which is $120 an ounce. That serum is also patented, so you can’t just buy a knockoff elsewhere. (You also can’t sell the stuff you’re making, but I hope you wouldn’t be taking recipes from this or any blog and trying to sell them for a profit.)
I am in capital-L Love with this product. It feels light and silky going on, it absorbs quickly, it doesn’t dry out my already-dry skin out (which is very rare for an active like this), and it does incredible work brightening, evening, and exfoliating.
I’ve made this recipe a few times and tweaked it along the way. I certainly don’t claim this as an original recipe – it’s 95% the same as the Lotioncrafter one – but there are some optimizations I’ve made, so I figured I’d share. Plus, my how-to has pictures!
Step 1: Gather Your Ingredients

Here are all the ingredients you’ll need. I highly recommend Lotioncrafter, Personal Formulator, and The Herbarie – I trust their quality completely and have only had positive experiences with them. MakingCosmetics is also a great resource, as are From Nature With Love and Ingredients To Die For.
- L-Ascorbic Acid
- Tocopherol (on Lotioncrafter, this is called Mixed Tocopherols 95%)
- Ferulic Acid
- Ethoxydiglycol
- Propylene Glycol
- Laureth 23 (for whatever reason, this is the only emulsifier I’ve found that works in vitamin C recipes)
- Panthenol
- 1% Hyaluronic Acid stock (you can either buy this premade on Personal Formulator, or make your own by mixing 1% normal molecular weight hyaluronic acid, 98.7% distilled water, and 0.3% Liquid Germall Plus in a bottle and letting it hydrate overnight)
- Distilled Water
- Liquid Germall Plus
You can add 1-2% of your favorite oil, for extra moisture and/or antioxidant effect – I sometimes add squalane. I’ve also been playing with the idea of adding some CoQ10, but it’s just so expensive. Note: if you do add an extra ingredient, it’ll be quite a lot thicker and stickier.
Step 2: Gather Your Tools

This looks like a lot, and it is. Since this is an emulsification, we have to heat and hold our separate oil and water phases at 70°C for 20 minutes and then mix it thoroughly, which means we need a whole bunch of extra tools we might not need for oil-only creations. You might have some of this stuff already lying around.
Check out my beginner’s shopping list and recipe for links to the basic DIY tools!
From left to right, I’m using:
- A scale that measures to 0.01 grams
- 70% isopropyl alcohol wipes for disinfecting
- A 1 oz colored glass dropper bottle to put the final product in (vitamin C is extremely sensitive to light, so a dark color for the glass is best)
- Powder-free latex gloves
- 2 borosilicate glass beakers, one for oil and one for water (make sure at least one of these beakers is big enough to fit a single beater from your electric mixer, if you’re using one)
- pH strips (the kind with four color boxes are much more accurate than the single-color kind)
- A hot plate
- A large borosilicate tub, to do my heating and holding
- A silicone trivet, to keep the beakers up off direct contact with the hot plate (I pictured a clay triangle here, which ended up getting rusty – a cheap silicone trivet works way better)
- Some disposable plastic pipettes (I DIY a lot so I bought this box of 500 of them and I love it much more than a person should love a box of 500 disposable plastic pipettes)
- A glass stirring rod
- Some aluminum foil
- A little spatula for measuring out dry ingredients (learn from my mistake and get a plastic one, not a metal one – you don’t want to use metal on L-ascorbic acid. You can use disposable spatulas if you want)
- A digital meat thermometer
- Disposable plastic boats for measuring out dry ingredients
- A kitchen hand mixer and a single beater for it
Step 3: Disinfecting Everything
If DIYers had a reality show on TLC, it would be called “Let’s Disinfect!” It takes so long but it’s so necessary.
- Wash your hands and put on gloves
- If you have liquid 70% isopropyl alcohol, pour it into your two beakers and let it sit while you do the rest of this
- Wipe down all surfaces with alcohol wipes (I like to follow this up by placing down clean paper napkins)
- Wipe down your stirring rods, spatulas, beater, and scale
- Disinfect your dropper bottle. Wash it with soapy water, rinse it well, then swish some isopropyl alcohol around and let it dry
- Swish around the alcohol in your beakers, pour it out, and rinse several times with distilled water (after that, you can either wait for it to air dry or wipe dry with a clean paper napkin)

Step 4: The Recipe
Here’s the full recipe to make 1 ounce of serum.
| Ingredient | Percent | Weight (g) |
| L-Ascorbic Acid | 15.00% | 4.5 |
| Propylene Glycol | 10.00% | 3.0 |
| Laureth 23 | 3.00% | 0.9 |
| Tocopherol | 1.00% | 0.3 |
| Liquid Germall Plus | 0.30% | 0.09 |
| Ferulic Acid | 0.50% | 0.15 |
| Ethoxydiglycol | 20.00% | 6.0 |
| Panthenol | 0.50% | 0.15 |
| Distilled water | 34.70% | 10.41 |
| 1% HA stock | 15.00% | 4.5 |
| Total | 100.00% | 30.0 |
Personally, I measure out dry ingredients into plastic boats, and I pipette wet ingredients directly into the beaker one drop at a time. The latter strategy is risky, but if you go slowly and have patience, it’s a lot easier than trying to scrape sticky tocopherol from the bottom of a plastic boat.
Step 5: Water Phase
I like to start with the water phase, but steps 5 and 6 are interchangeable.
- Combine propylene glycol and ferulic acid in beaker A and stir until dissolved. Ferulic acid is stubborn, so it will start out like this:
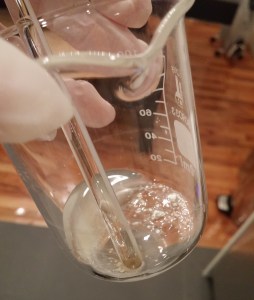
- But after some mixing (you can speed this up by sticking it in a warm water bath), it’ll dissolve completely:

- Once it’s dissolved, add the hyaluronic acid stock, distilled water, and panthenol; stir until it’s an even consistency

Step 6: Oil Phase
This one’s easy.
- Combine tocopherol, laureth 23, and ethoxydiglycol in beaker B. No real point stirring, since laureth 23 is just big waxy chunks.

Step 7: Heat and Hold
The laureth 23 is still solid, so let’s get it all liquid-ed up.
- Fill the borosilicate tub partway with tap water and put your silicone trivet in it
- Put it on your hot plate and heat it until it reaches 70°C. (My hot plate sucks, so I turn it on until it reaches 58°C, then unplug it. At that point, the residual heat will take it to 75°C, and over the course of 20 minutes, it’ll cool to 65°C. Good enough for me.)
- Cover your oil and water phase beakers with aluminum foil to prevent evaporation and keep them clean.
- Place your two beakers on the silicone trivet – you can remove water with a pipette if the water level is too high and the beakers are floating
- Hold them at that temperature until the oil phase beaker melts
- Watch how they turn clear! Science is so cool!

Step 8: Emulsification
Once everything is good and melted, your phases are ready to combine.
- Dry off the outside of beaker A (the water phase), weigh it, and note the difference – in a few minutes, you’ll add this back in distilled water to get it to its pre-heating weight
- Pour the contents of the smaller beaker into the larger one (or however your beakers are sized – the important thing is that everything is in a beaker big enough to fit a hand mixer beater)
- Immediately start mixing with a single beater on your hand mixer’s lowest setting. Mix for 1-2 minutes. As you mix, keep an eye on the texture. It may start gelling up like snot. If it does, stop. If it doesn’t, keep going to the 2 minute mark.
- Add distilled water equal to the difference between pre- and post-heating weight
- Leave it until it feels about room temperature to the touch
Step 9: Final phase
Now is the time to add your heat-sensitive ingredients – in this recipe, that’s L-ascorbic acid and preservative.
- Add the L-ascorbic acid and stir gently with a glass stirring rod. Be careful – too much agitation will make that gelling problem worse. Stir until it’s completely dissolved.

- Add the Liquid Germall Plus and stir again with a glass stirring rod. If it’s gelling up, again, just stir in short bursts until it’s mixed throughout. The recipe should be completely clear, with a slight champagne/pale yellow color.

Step 10: pH Test, Bottle and Celebrate
Almost done!!
- Smear a little bit over a pH strip – I aim for around 3, since you want this to be between 2.5 and 3.5. If it’s way off, you can add citric acid to lower the pH or sodium lactate or triethanolamine to raise it.
- Pour the final product into your colored glass dropper bottle, or, if it’s too gelled to pour, transfer it with a pipette
- Label the bottle with the name of the product and today’s date
- Pour yourself a stiff drink – you’ve earned it

If you do end up trying this recipe, let me know what you think! I’m always looking for ways to improve.
I was so excited to see the notification for this post pop up in my email! Didn’t get a chance to post till now. I love the way you’ve shown your step by step process, really informative. And this is well timed because I’m actually in the process of putting together an order from Lotioncrafter and Skin Essential Actives and gathering supplies. I don’t see myself doing anything more than DIY for personal use but I’m wanting to start with an essence and a facial mist. I feel completely out of my element so I’m not doing anything with an oil phase of that requires heating. I’ll probably do a mix between Chel’s super easy Holy Snail Water and her Shark Sauce 2.0 she has up but with my own variations.
I was curious, I noticed you added a preservative into your HA stock. Is that necessary if it’ll immediately be used in a recipe with a preservative? Though I suppose you might as well so you’ll have extra stock on hand. I’d love to try this Vitamin C recipe eventually but idk, for some reason the oil/heat phase is what makes me nervous. And I’ve seen several people struggle with Chel’s Vit C recipe and with clumping, guess it’s a tricky one.
Oh yaaay I’m glad you’re gonna try DIY! It’s the best. In terms of the HA stock, you don’t need a preservative if you’re going to use it in the next 24 hours, but I like to make a big bottle of it and keep it around.
Thanks so much! Lol I’m prepared for epic failure. I’d like to email you about holding/heating at some point if you don’t mind.
Of course!
If you cover the water phase with aluminum foil you won’t have to worry about evaporation. I find that it also helps prevent the non-distilled water from ending up in either beakers.
Interesting, I might give that a try!
May I ask -very respectfully- is there any reason why you would not use foil/ a lid of sorts to prevent evaporation/ contamination?
As I’m sure you know:
At standard pressure, water boils at 100⁰C, but it is still evaporating at temperatures well below that.
I believe that the same/ similar can likely be said for the many other ingredients in play; as such, I’d always cover.
May I ask why you’re using those beakers rather than erlenmeyer flasks?
Thank you!
Curious, if I don’t have any of the products needed to make this Vitamin C, what’s the startup cost to buy all of them?
You can actually get a kit from Lotioncrafter with all the ingredients for $60: http://www.lotioncrafter.com/c-e-with-ferulic-acid-kit.html
Would you recommend this kit first? as a try-out to see if i can do it (I’m a COMPLETE noob and already some of the stuff you said confuses me haha)? I’ve been itching to make my own vita c serum and looked at Chel’s recipe and yours and am just scared of failure and buying all these items and spending so much money initially for no reason. Also, they do not give an option to buy things like beakers, pipettes, hot plate, weigh boats, etc. Do I have to buy these myself, aside from the kit?
Eventually, I’d like to just buy the ingredients separately to make the serum.
Thank you so much for all of your advice!
Yes, I think the kit is a great way to try out vitamin C recipes. That said, it’s a pretty challenging recipe to start out with – if you haven’t, you might want to check out my beginner DIY recipe and shopping list post.
Lotioncrafter does sell all the paraphernalia, but you can find it on Amazon for cheaper.
this reminds me SO much of my lab days… but considering I did research at a lab where we sacrificed rats and rat pups, among other things, I would probably not want to go there to do this… 😉 I really must say I admire all of you guys who want to do all this DIY at home because I’m not even sure I can summon up the energy to do this as someone who is familiar with these sorts of things to begin with!! we shall see… thanks for the tutorial, bookmarking for that day when I dare~ 😉
Question about the L-AA gelling/clumping when mixing. Why do you stop immediately? Does it “melt” back down, at which point you resume mixing? What happens if you continue to mix? I’m planning on ordering the kit to give it a go for making a vitamin C serum.
I recommend stopping immediately just because once the gelling process starts, it seems to happen exponentially quickly. When it starts to goo up, it’s best to stop and only stir in short, slow bursts just until everything is dissolved and nothing more.
I’ve pushed past through that gelling phase a couple of times, and I end up with a thick, snot-like product that’s really hard to use with a dropper bottle. It still works fine, it just feels unpleasant.
For some reason my serum turned out semi opaque, but its most likely because of the changes I made. However the ferulic acid didn’t tint it yellow which I find suspicious.
I’ve found that when I add additional oils, it can cloud the final product. I can’t help diagnose the problem without knowing what changes you made, though!
Can I substitute liquid germal plus for something else? AFAIK I can’t get it in UK
Sure! Any broad-spectrum preservative that works in a low pH would work.
And can I substitute another solvent for ethoxydiglycol? Many thanks for putting up your valuable recipe online an responding quickly but now I may have to abandon the idea of making my own vitc serum. There’s just not anything similar to lotioncrafter in Europe.
You don’t strictly need the ethoxydiglycol, it just helps with the texture of the product and keeps it feeling light. You can try replacing it with distilled water and see how that goes!
Where did you purchase your UK ingredients?
Do you store this in a refrigerator? I usually half the ethoxydiglycol and propylene glycol, because I find it’s very sticky otherwise. But then, I’m also using glycerin. I guess what I’m asking is… how is the consistency for you. Also, if you’ve observed it, do you find the consistency varies from refrigerator to room temp?
Why no triethanolamine? (Which is in the LC recipe.)
Thank you so much for this write-up! So many awesome tips.
I don’t store mine in the fridge because my laziness truly knows no bounds, and I can’t bring myself to walk from the bathroom to the kitchen every morning. But if you can hack it, it will definitely last longer if you store it in the fridge. The consistency gets a little thicker and more viscous in the fridge, but not unworkably so and it warms up quickly on your fingers.
I personally don’t have any issues with stickiness with this recipe, but if there’s one thing I’ve learned from when my beloved testers were trying out versions of Rewind, it’s that stickiness varies HUGELY from person to person. What feels light and matte on one person feels like straight honey on another. But yes, glycerin is very sticky, so I imagine that’s where your problem is coming from.
I skip TEA because I’ve never had an issue with pH in this recipe (the TEA is used to raise the pH if it’s too low).
Thank you so much. I’m antsy to try this recipe again. Ordered some odds and ends from Amazon, and I’m going to follow your method and ingredients. 🙂
Hi, so excited to try this recipe I have my cart ready to go at LotionCrafter but I just have one question on the Hyaluronic acid to make my stock. Is this the right one?: Hyaluronic Acid Molecular Weight 1.0 – 1.5 Million Daltons. Thanks!
Woohoo, so exciting! Yep, the highest molecular weight is the one to go with (the lower weights don’t create that nice gel texture, and super low weights can trigger inflammation). Let me know how it goes!
Couple questions, I’m sure I’ll have more lol.
– The “gelling,” this must be indicative of something happening that shouldn’t be, no?
When we’re stirring beyond the point of simply blending, it’s usually to hasten some chemical reaction that’s taking place; increasing the rate at which particular molecules are interacting. I would think that either gelling should occur, or indicates some degree of the cocktail is no longer useful?
Also I agree with the above who mentioned using tinfoil to keep from losing water, but also to maintain sterility – especially if this is not performed around a bunsen burner to provide an asceptic work area.
Remember to be careful when switching preservatives. You might increase the stability of L-aa and prevent oxidation. But also lose out on stability by removing some compound that was a more suitable antimicrobi for the spoilers of concern here.
Also, failure to filter the end product ensures that the toxic peptidoglycan of the dead bacterial cell walls remains in the product.
When tested, it will appear sterile with no live bacteria but may easily be loaded with toxic cell parts.
And kathy, regarding the thermometer and “heating it to 58…..then unplugging it… and it heats to 75, then down to 65…etc”
This is problematic on a couple fronts. Firstly, it MIGHT be known that any one of the ingrediants denatured at 72, for example, and that the bacteria require “10 minutes at 70 for 99.9% cell death”
But also that they can live forever at 68 (possibly) and relying on the extra time at 75 is a mistake. It’s like taking all ten antibiotic pills over 1-2 days instead of a week etc.
Lastly, I may well be mistaken, but I believe I remember reading the patent saying certain steps had to be completed in an oxygen free environment, aka using argon or nitrogen tanks, either catalyzing a particular step, or prevent some rapid oxidation before some stabilizer lends its effects.
Thoughts?
Are there any additional ways to combat the gelling problem? We sorta had this discussion on reddit but I am on my third batch now and the gelling problem just seems to get worse and worse for me.
My latest batch wouldn’t even flow when I invert the dropper bottle, a huge block of jello. And i’ve tried to mix as little as possible. In fact, something really odd happened to me during the latest batch. The mixture started to gel so I did the start and stop thing then it suddenly became liquid again and not a single bit of stickiness was found. I poured an even and runny fluid into the dropper bottle then it gelled up in the bottle about 4-5 hours later. I have no words.
Does anyone notice any patterns about when the serum gels up? Is there any steps I could tweak? maybe I was mixing too little, maybe too much and I should let it diffuse with no agitation. maybe my water bath was too cold or too hot. anything that could save me from all the gelling ><
That’s so strange! Can you describe how you mix it during the production process?
There are two things that I changed as far as I can discern.
The first one is I added 0.9 g of egcg and 0.06 g of Disodium EDTA while taking away 0.96g of water.
One of my main goals is actually using a 2-3% egcg serum so I had to do it (evidence published in the Journal of investigative dermatology- highest impact journal in the specialty, seems to suggest that it is one of the best anti-acne topical ingredients out there).
The second one is I did not use an electric mixer so it was glass stirring rod all the way. However, it did not seem hard to mix together at all after the water bath so I thought it would be fine.
———————————————————————
So, what happend was the solution started to gel up a little half way through mixing the vitamin c. The tip of the stirring rod started to have a little bit of gel stuck on it that would be sticky (barely able to fall off) when stirring rod was removed from mixture. This bit of sticky gel would coalesce a bigger ball in the solution if mixing for long so I would stop for long periods of time hoping it would go away. Then, the ball got bigger during the egcg mixing phase.
Edta seems to be what triggered the transient liquid phase. Perhaps due to the fact that Edta was not soluble at the PH and would precipitate out, disrupting the forming complex? Therefore, after edta was added, it became a clear non viscous liquid with white (edta) precipitate on the bottom (spent a long time trying to mix in the edta before i figured it wasnt soluable. still did not gel back up after the minutes of hard mixing).
I then poured the non viscous solution into the dropper bottle, applied the first time fine. But the next morning it practically solidified.
thanks. Ultimately I just want a vitC serum with 2-3% egcg. why is this so hard ><
I attempted this today! I used Germaben II instead of Liquid Germall Plus, but after doing some research I figured that was fine. It says it works in emulsions if the oil phase is less than 25%, and this is 24%. I had to add a little extra Germaben II, since it’s effective from 0.5%-1.0%, but I doubt that’ll be a problem.
Right now, I’m just waiting for the foam to settle. The hand mixer I use makes it foamy! If I continue to have the problem of the Unknown Shards forming in the serum, I think I’m going to look into this foam situation. At least I didn’t have gelling problems.
It was awesome working with the disposable boats and pipettes. The alcohol wipes, goggles and gloves also made things super easy. (Yes, I am a bad person and wasn’t working with gloves before…)
I’ll return with an update in a few weeks about how the serum turned out.
Thank you!
I said I’d return with an update and then never did. It worked out GREAT. It’s been 4 months and I’ve made a 2nd batch after the first giving me no problems. Thank you, thank you!
HOORAAAAY! Thanks for the update 🙂
What is the shelf life once you make a batch?
Thank you. I have the same Question.
NVM found from previous post. 6-8 weeks
thanks so much for your blog 🙂 I would like to try a c/ferulic but omit the tocopherol, so
1) I assume I can also drop the laureth-23?
2) should I keep the same amount of PG + EDG? does ferulic acid dissolve better in PG or EDG? is there a particular benefit to using both or would just EDG be enough?
thanks so much 🙂
Hi Katie! Yes, without the E, you don’t need the emulsifier. I would recommend keeping the same amount of PG, which is the solvent for the ferulic. The EDG functions as both a secondary solvent and a skinfeel agent, keeping the whole thing from feeling so heavy and sticky. You may not need as much EDG without an oil phase – I’d try that one out and see what you think.
thanks so much for the fast response 🙂 maybe I’ll try 10% each of PG + EDG, think that might be enough? [btw I’ll start w/ a 10% LAA before bumping up to 15%]
Sounds good, let me know how it goes!
Hey so I tried it out! 10% each PG, EDG, LAA (and oops actually 30% of the 1% HA stock, forgot that your recipe only called for 15…) and it worked quite nicely! I did the ferulic + PG first, then EDG, then HA + water. I wasn’t really sure if these were mixing properly b/c it was kinda thick + bubbly? like filled with tiny internal bubbles (is that normal?) the instant I added the LAA it did the gelling/snot thing very visibly haha, will definitely be more careful next time. I don’t think the thickness I have would work w/ a dropper bottle but I actually use amber glass pump bottles to minimize opening and closing too much, and it works nicely with a pump
I actually find that the EDG makes it a little bit TOO light for me haha. I prefer something that I can take more than a few seconds to rub in, then still have a slgiht perception that it’s on my skin haha. I might try 15/5% next time… and also up my LAA b/c I didn’t have irritations w/ the 10%
Yaaay! Thanks so much for letting me know how it went. I think bringing the amount of HA down will help with the texture a bit, since HA gets pretty thick. So glad it’s working out for you!
Thanks for doing SO much work putting together this entire recipe for those of us too lazy to do it ourselves!! 🙂 My question is: Do you know if there is any chemical change in the Tocopherol or the other two ingredients when they are heated and mixed together? Thanks!
Can I make this without making the HA stock? I’m shopping on LotionCrafter. Also how long would you say each batch can hold, do you have any experience making these in large batches, more than 1 oz at a time?
Hi Michael! You could make it without the HA, but it would be pretty runny and watery – the HA helps give it a nice gel-type texture. In my experience, it will last about 6 to 8 weeks in my cabinet before oxidizing; probably 3 or 4 months if you stored it in the fridge. I’ve only ever made about 3oz at one time, since I can’t use more than an ounce before it oxidizes so I only make extra if I’m giving a bottle to someone.
I am trying this for the second time. I have a couple questions. Has anyone ever tried using high-proof vodka in place of the PG? If so, did that work? I’m trying to avoid using the EDG and Propylene glycol because, as far as I can tell from the research I’ve done, those are the only ingredients with any harmful effects.
Secondly, my serum started to separate after a couple of days. Could this be because I didn’t use Laureth
23? And one more Q: My last batch immediately looked quite yellow from the ferulic acid.. How can you tell if the L-AA has oxidized if it’s yellow to begin with? Thanks for your help!!
Hi thank you so much for taking the time to make this tutorial!
I just got Lotioncrafter kit yesterday, and reading through their instructions, I noticed that they don’t require a “heat and hold” step. From their wording, I’m assuming only the oil phase needs to be heated to 60 degrees, and can be removed from heat once it reaches that temp. My question is, is there a reason why you recommend holding it at the heated temp for 20 mins? I’m really sorry I’m a total noob, I just want to do it in the easiest way possible with minimal screwups. Also, for your “heat and hold” step, do I need to heat BOTH the water and oil phases? or just the oil phase? Any words of wisdom you can offer will be greatly appreciated, Thanks!
I like to hold both phases at a high temp because it helps kill off any nasties that might be in there. It’s not strictly required, just a nice-to-have.
I do find that for creations with oil and water phases, the emulsion holds much, much better if both phases are heated to the same temp before combining. So at the very least, I highly recommend heating both phases together 🙂
How would one adjust the recipe to get a lower concentration of Vitamin C? For example, I have been told that I should start using a lower concentration of Vitamin C Serum before going straight to a stronger blend. So if I wanted 10% Vitamin C Serum would I simply cut 4.5g of Ascorbic Acid down to 3.0g. Or would I need to adjust other ingredients as well? I’m assuming this Vitamin C Serum is 15%.
Hello?
Hi! I don’t check the blog comments very often, thus the lateness of this reply. If you want to cut the Vitamin C, reduce to 10% and replace the remaining 5% with water.
Hi Alli! I recently came across your blog (through instagram) and I am hooked!! Love your DIY recipes with clear instructions and illustrations! And congratulations on launching stratia skin!! I have also signed up to test your products! Super excited about that! I do have one question, slightly off topic for this post. Please bear with me, as I was not sure where else to post my question. I am seeing a lot of attention towards an ingredient “Astaxanthin” these days. There are a few products with this ingredient, that are pretty successful, but also expensive. I was wondering if you have any idea of creating a DIY with astaxanthin? If not, perhaps you could direct me to some already existing DIY?? Thanks a lot for taking the time to go through my comment!
Hi Shruthi! Unfortunately I haven’t worked with Astaxhanthin, nor have I seen any DIYs with it. I’ll put it on my list to experiment with though!
Hi! I recently used your tutorial to make my first batch using ingredients from Lotion Crafter. Thank you so much for taking the time to create this tutorial. I hope in the long-term this serum will be worth the fuss. 🙂
Hi! I am a total noob and didn’t know people can DYI their own skincare. I’m blown and excited to dip my hands into it. I am able to get Ascorbic Acid 500mg/ml where I work. How much Ascorbic acid (in mL) should I measure out using your recipe? Also, is there an ingredient or two I can skip because I’m already using the liquid form of Ascorbic acid? Thanks you for your help.
Reblogged this on Living a wabi-sabi life….
Hi!
I am from Brazil so please forgive me for my english…
The metal from mixer is not a problem in the oxidation of c vitamin? I saw some recipes, like that from holy snails that says not to use nothing with metal to avoid oxidation. I am confuse, because I think that use a mixer musto to be so good. But I am afraid to…
Thanks,
Melissa
I ran out of Propylene Glycol, is this necessary for this serum?
Hello
I made this but added a little more .43 instead of .33 of the preservatives and used drinking water ( keep forgetting to buy distilled water and been anticipating and impatience as I wanted to make this).
You think my serum will be fine? Thank You
I just love your blog!!! 🙂
WOW – I have made C serums before, but with a different recipe. I will try this one once I get all the needed equipment. 🙂 I do have a couple questions for you – the serum I made in the past had sea kelp bioferment in it. Would it be of any benefit in this recipe, and would it even work to add some to this recipe?
Thank you SO much for this – my old recipe had problems (the C crystals would precipitate out and it felt slightly gritty) Your recipe is a lot more work than my old one, but I suspect this one will turn out a lot better! 😀
Thanks for any advice you might have!! Can’t wait to get “cooking!”
Kim
Hello i have a question what ingredients can i replace with water .i dont mind having a watery consistency serum .i want to know what ingredients i can replace with water .
When using the hyaluronic acid stock that has the liquid germall in it should I still use the germall plus in the vitamin c recipe? Thanks
Yes, the LGP in the hyaluronic stock will be diluted when you add it to the formula so you still need to add additional preservative.
Just made it for the first time and it went swimmingly. Thank you for the instructions, they were very clear. There was one moment of doubt for me when I weighed the ascorbic acid. It was a huge pile, I thought there was no way it would all be dissolved!
The pH ended up being 2.3 for me. It doesn’t sting my skin so I’ll just use this batch, but for my next batch I will add some triethanolamine.
Two things I noticed when applying it. It does ‘froth’ a little bit when I apply it. It also has a slight smell. Do you experience this too with your batches?
I just started doing my own DIY skin care. i have made cleansing oil and cleansing powder fo a 2 step cleanse. I have formulated my own toner comprised of hydrosol, rice water and green tea I am currently working on a red ginseng, shiitake and snow mushroom serum with hyaluronic acid,
My questions about the C, E and ferritic acid serums are (1) can i substitute birch sap for the water phase? (2) If i add co-q10 how much should i add? (3) can glycerine be added for extra moisture.
1) No, I don’t recommend substituting birch sap or other products like that for the water phase. It makes it impossible to preserve and can cause unwanted interactions with other ingredients. 2) I recommend sticking to manufacturer guidelines when it comes to usage rates. It really depends on what type of CoQ10 you’re using and its concentration. 3) Yes, it’s fine to add 1-3% glycerin. It’s functioning the same as hyaluronic acid in this case so you may want to remove the HA if you add glycerin.
Thank you for posting this recipe, I’m excited to try it.
Also, not to be snarky, but…I’m surprised at how many people want to replace ingredients with others.
A recipe is a guideline, but when it comes to skincare formulations…this is chemistry, folks! Know what you’re dabbling in, if you don’t plan on following instructions.
Not every ingredient is easy to find outside of America.
How do your instructions differ from the ones on their kit? I was thinking about making the kit to begin with but they raised the price. I was considering making the kit on my own but don’t want to mess up the instructions.
I’m not sure, I haven’t ordered the kit. Sorry!
So I have read all of the reviews and I still don’t specifically see a cure for the snot issue.
My serum was great after I mixed my water phase and my oil phase, but it had a large amount of froth on top. I waited for the temp to drop down to room temp and the stirred in LAscorbic powder (there was still a lot of foam and the LAscorbic wasn’t mixing in well. So I used my plastic mini mixer on pulse to try to mix in the LA. Instantly it turned to snot.
I’ve made another serum where the LA was added into the water phase before the water and oil phase made and emulsion. That was HolySnails Vita sea formula. The c dissolved but the entire serum had lumps of gel in the end. Is it the LA that makes shots and clumps? How do I prevent this unpleasant snot or clumping texture?
Thank you so much for this wonderful post with such detailed directions!
Have you tried using Optiphen Plus instead of Germall for this serum?
Love your post. I have a question can I replace Ethoxydiglycol with anything else. I live in Canada and I can’t find it here anywhere.
Mazda20,
Ethoxydiglycol is readily available to Canadians. Where have, and haven’t you checked thus far?
Please advise on where to buy it from.
Hello Acid Queen,
I am going to make that recipe 😘. Just wanted to know shelf life of that product?
Thanks
Thank you so much for creating this easy to follow recipe! Since adding the vitamin C makes the serum spoil faster, would it be possible to make like half a year worth of this serum in one batch without vit C, and then just add the vit C powder whenever you need to fill a small bottle(30ml)?
How is it that Timeless’s C-E dupe is allowed to be on the market? I heard that it’s less effective than SkinCeuticals’s product and goes bad faster. Would you say that the same is true here?